Contacts & Alerts
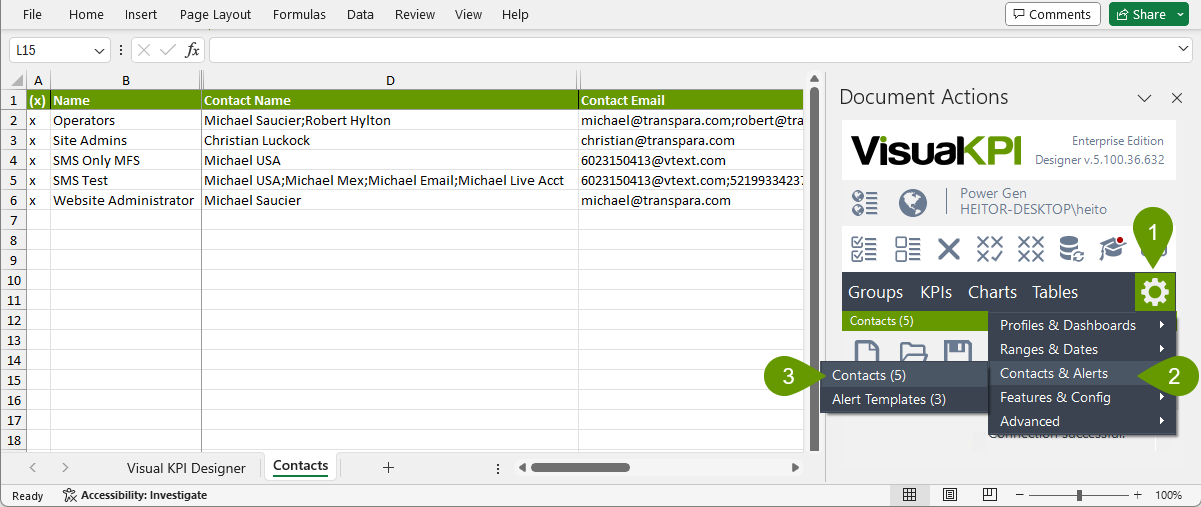
Visual KPI Designer enables you to configure contacts that can be referenced in your KPI data. This feature gives end users quick access to the person responsible for a specific data set. Once you've created and saved a contact, it becomes available in the Contact pull-down lists within the Groups, KPIs, Charts, and Tables worksheets in Visual KPI Designer.
While contacts provide a way for end users to report problems or request help, Alert Templates automatically send out notifications to chosen contacts. In Visual KPI Designer, you can define the types of alerts to be sent using Alert Templates. You can decide what information the alert email should include and the time intervals to send the alerts.
Configure Contacts
To add and configure new contacts, follow the steps:
- Click the Site Settings icon (
 ).
). - Select Contacts & Alerts.
- Then, select Contacts.

On the Contacts worksheet, you find all existing contacts.
Add a new contact
To add a new contact to the list, follow the steps:
- Add a Name on the first blank row below the column headers.
- Add a Description if appropriate.
- Enter one or multiple Contact Names, Contact Emails and Contact Phones. If you want to enter multiple names, emails, or phones, separate them with semicolons.
- Place an x in the first column for the new contact.
- Click the Save button (
 ) to write the changes to the database.
If some of the available parameters are unclear, you can refer to the Contacts reference page.
To save your changes, place an x in the first column for each object you want to save. All Contacts marked with an x will be saved to the Visual KPI Server by clicking the Save button (![]() ).
).
After adding a contact, you can edit it by overwriting the values in the cells, placing an x in the first column for the contact you want to edit, and then clicking the Save button (![]() ).
).
To remove contacts, place an x in the first column for each contact you want to delete. Then click the Delete Selected Contacts button (![]() ).
).
Be careful when deleting contacts. All Contacts marked with an x will be deleted from the Visual KPI Server. Before deleting your contact data, we recommend saving a copy of the VisualKPIDesigner.xlsx file. If you change your mind later and wish to retrieve this data, you can open a copy of the VisualKPIDesigner.xlsx file and re-save it.
Configure Alert Templates
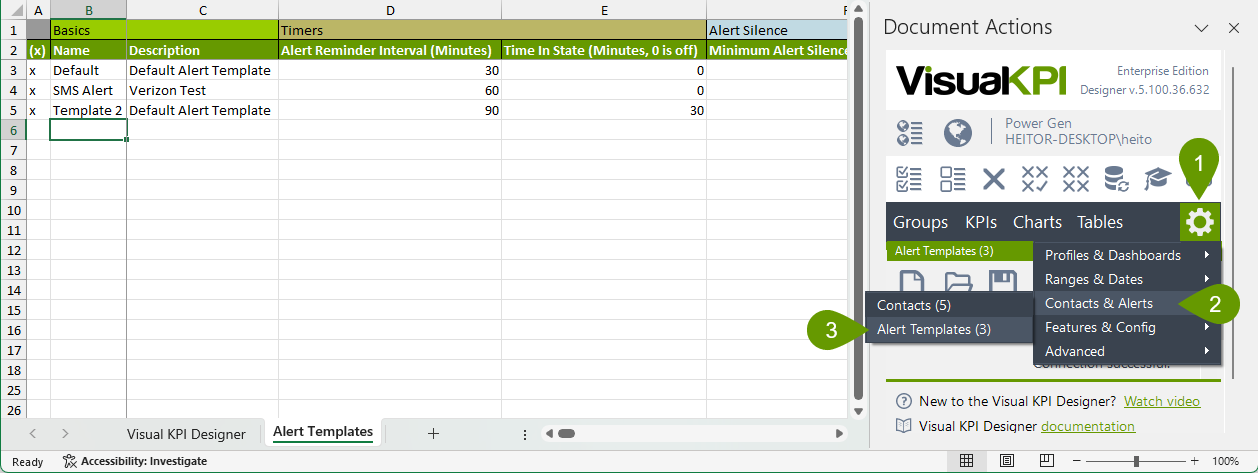
Alerts in Visual KPI Designer allow you to define notification settings based on various KPI states. In Visual KPI, you are not creating individual Alerts, you're creating Alert Templates, a predefined set of rules that determine when and how notifications are triggered based on KPI status. End users can select and apply these templates to the desired KPIs.
To access the Alert Templates, follow the steps:
- Click the Site Settings icon (
 ).
). - Select Contacts & Alerts.
- Then, select Alert Templates.

On the Alert Templates worksheet, you find all existing templates.
Add a new template
To add a new template to the list, follow the steps:
- Add a Name on the first blank row below the column headers.
- Add a Description if appropriate.
- Enter Alert Template configurations. See the Alerts reference page for a detailed description of each option available.
- Place an x in the first column for the new template.
- Click the Save button (
 ) to write the changes to the database.
The Alert Templates are defined for the existing KPI status, which refers to the different statuses a KPI can have, such as Low, High, and Out of Range. The notifications will be triggered when the KPI enters or remains within a specified status for a certain period.
When configuring a template, you can define the notification behavior for each possible KPI status. For example, you may choose not to trigger notifications for Low status, configuring the notifications only for High, High High, and High High High status. In addition, you can set different contacts for each status.
Available configurations
Several configurations are available when configuring a template. However, most of them repeat for each KPI status available. Use the following buttons to view a general description of the available configurations. For details about each parameter available, see the Alerts reference page.
Visual KPI Designer enables you to toggle between basic and advanced modes (![]() ). The advanced mode makes more configurations (worksheet columns) available. Therefore, if you aren't finding a specific configuration, check if you have enabled the advanced mode.
). The advanced mode makes more configurations (worksheet columns) available. Therefore, if you aren't finding a specific configuration, check if you have enabled the advanced mode.
Basic settings
| Field Name | Description |
|---|---|
| Name | The name of the Alert Template for internal reference. |
| Description | A description of the Alert Template. Provide a clear description to make it easier for end users to understand when to use the template. |
| Template Enabled | Toggle to turn the Alert Template on or off. |
Timing settings
| Field Name | Description |
|---|---|
| Alert Reminder Interval (Minutes) | The wait time until reminder notifications are resent. |
| Time In State (Minutes) | The duration a KPI must remain in a state before notifications are sent. |
| Minimum Alert Silence Duration (Minutes) | The minimum wait time until normal alerts are resumed. |
Alert control settings
| Field Name | Description |
|---|---|
| Alert Silence | Toggle to turn the Alert Silence feature on or off. If silenced, no notifications will be sent. |
| Alert Silence Interface | Interface used to retrieve the In Alert Silence value. |
| Send First KPI Alert When Silenced | Controls whether a notification is sent after KPI alerting is silenced. |
| Alert Silence Contact | The contact notified when a KPI alert becomes silenced. |
Notification settings
| Field Name | Description |
|---|---|
| Alert When [Status] | Controls whether a KPI with this status triggers a notification. |
| Remind When [Status] | Controls whether a reminder notification is triggered for a KPI with this status. The remainder is only triggered if the KPI is on this status for a time equal to the Alert Reminder Interval. |
| Notify Contact When [Status] | Controls whether the KPI Contact is notified when the KPI enters or stays within a specified state. |
| Notify Alt Contact [1/2] When [Status] | Controls whether Alt Contacts are notified when the KPI enters or stays within a specified state. |
Additional settings
| Field Name | Description |
|---|---|
| Include History in Alert | Controls whether the KPI alert history is included in the notification. |
| Include Limits in Alert | Controls whether the KPI limits are included in the notification. |
| Include Source (Tag) in Alert | Controls whether the KPI source (tag or index) is included in the notification. |
| Include Attributes in Alert | Control whether the KPI custom attributes are included in the notification. |
| Include Groups in Alert | Controls whether the groups the KPI belongs to are included in the notification. |
| Reference Count | The number of times the Alert Template has been used (read-only). |
| Alert Template ID | Read-only system-level identifier. |
Alert Templates usage
You can verify the KPIs currently using each Alert Template. Follow the steps below to access the information:
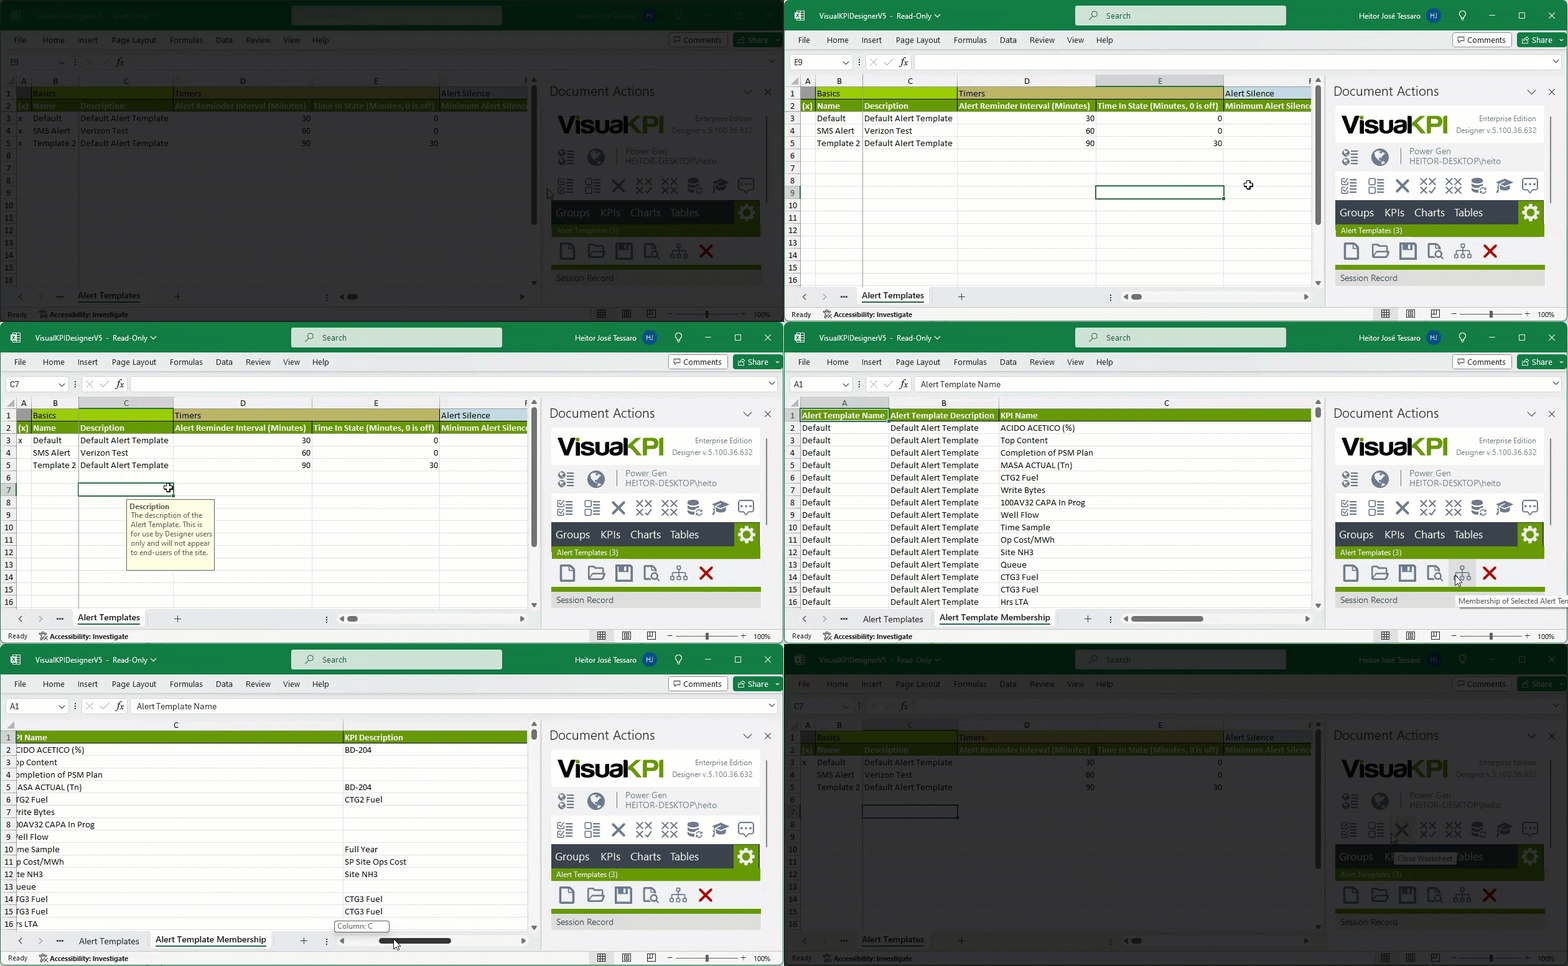
- Select the desired Alert Template by placing an x in the first column for the corresponding row.
- Click on Membership of Selected Alert Templates button (
 ).
).
All KPIs that have the selected alert template assigned will be displayed on a new worksheet.
